Stop wasting time, effort, and perfectly good produce! The humble vegetable peeler sitting in your kitchen drawer is capable of so much more than you ever imagined. Yet, most home cooks struggle with thick, uneven peels, wasted flesh, and frustrating kitchen accidents. What if mastering the best techniques for using a vegetable peeler for fruits and vegetables could transform your meal prep from tedious to effortless?

Introduction: Why Proper Peeling Technique Matters
The vegetable peeler is one of the most underestimated tools in modern kitchens. While it might seem like a simple device that requires no special skill, learning the best techniques for using a vegetable peeler for fruits and vegetables can dramatically improve your cooking experience, reduce food waste, and even enhance the nutritional value of your meals.
According to food preparation experts, improper peeling techniques can waste up to 30% more edible produce than necessary. Beyond waste, poor technique leads to hand fatigue, uneven cooking surfaces, and increased preparation time. Whether you’re a culinary novice or an experienced home chef, mastering your vegetable peeler will revolutionize how you approach food preparation.
In this comprehensive guide, we’ll explore every aspect of vegetable peeler usage—from selecting the right peeler type to advanced techniques for specific produce. You’ll discover professional tips that will make peeling faster, safer, and more efficient, while preserving maximum nutrition and flavor in your fruits and vegetables.
Understanding Your Vegetable Peeler: Types and Their Best Uses
Before diving into techniques, it’s essential to understand the different types of peelers and their optimal applications.
Types of Vegetable Peelers
1. Y-Peeler (Swiss Peeler) The Y-shaped peeler features a horizontal blade perpendicular to the handle. This design allows for smooth, controlled strokes that follow the natural contours of produce.
2. Straight Peeler (Traditional Peeler) The classic design with a vertical blade aligned with the handle. This peeler excels at creating consistent, straight peels on cylindrical vegetables.
3. Serrated Peeler Equipped with tiny teeth along the blade edge, serrated peelers grip slippery or soft-skinned produce without sliding.
4. Julienne Peeler Features multiple small blades that create thin strips, perfect for garnishes and salads.
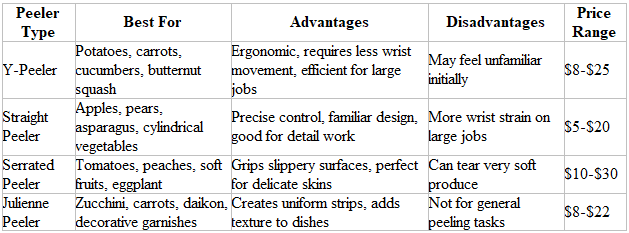
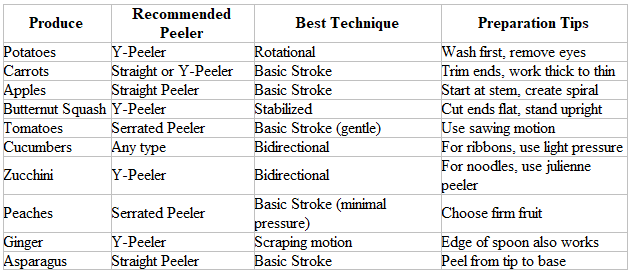
Peeler Type Comparison Table :
Essential Techniques: The Foundation of Perfect Peeling
1. The Basic Stroke Technique
The foundation of all peeling begins with mastering the basic stroke. This technique applies to most firm fruits and vegetables.
Step-by-Step Process:
⦁ Secure Your Produce: Hold the vegetable firmly in your non-dominant hand. Position your fingers away from the peeling path.
⦁ Angle the Blade: Place the peeler blade at a 20-30 degree angle against the skin. Too shallow won’t catch the skin; too steep wastes edible flesh.
⦁ Apply Gentle Pressure: Use consistent, light pressure. The blade should glide smoothly without digging in.
⦁ Execute Long Strokes: Make long, fluid motions from top to bottom or end to end. Short, choppy strokes create uneven surfaces.
⦁ Rotate and Repeat: After each stroke, rotate the produce slightly to tackle a new section.
Pro Tip: The best techniques for using a vegetable peeler for fruits and vegetables always prioritize safety. Keep your supporting hand’s fingers curled and away from the blade’s path.
2. The Rotational Technique
Perfect for round or cylindrical produce like potatoes, apples, and beets.
Method:
⦁ Hold the produce in your palm
⦁ Keep the peeler stationary at a slight angle
⦁ Rotate the vegetable against the blade
⦁ The produce moves while your peeling hand remains stable
⦁ This technique reduces hand fatigue for large batches
3. The Stabilized Technique
For maximum safety and control, especially with harder vegetables.
Method:
⦁ Place the vegetable on a cutting board
⦁ Hold it steady with your non-dominant hand
⦁ Peel downward strokes away from your body
⦁ This technique provides excellent stability for tough-skinned produce like butternut squash or sweet potatoes
4. The Bidirectional Technique
Modern peelers with dual-direction blades allow efficient back-and-forth peeling.
Method:
⦁ Position the peeler at one end
⦁ Pull toward you to peel
⦁ Push away from you on the return stroke
⦁ This technique doubles efficiency and works exceptionally well with Y-peelers
Advanced Techniques for Specific Produce
Mastering Root Vegetables
Potatoes and Sweet Potatoes
Potatoes respond beautifully to the rotational technique:
⦁ Rinse thoroughly to remove dirt
⦁ Hold the potato in your palm
⦁ Use a Y-peeler for optimal efficiency
⦁ Rotate continuously while maintaining blade contact
⦁ Pay special attention to eyes—use the peeler tip to dig them out
Efficiency Tip: For large batches, peel continuously for 2-3 minutes, then switch hands to prevent fatigue.
Carrots and Parsnips
These cylindrical vegetables require special handling:
⦁ Trim the ends first for better grip
⦁ Work from thick end to thin end
⦁ Use the straight peeler for maximum control
⦁ For baby carrots, use light pressure to preserve shape
Beets
Beets present unique challenges due to staining and tough skin:
⦁ Wear gloves to prevent staining
⦁ Use a Y-peeler with firm pressure
⦁ Work over a bowl to catch juice
⦁ Peel immediately after blanching for easier removal
Perfecting Stone Fruits and Pomes
Apples and Pears
Achieving thin, even peels on round fruits requires finesse:
⦁ Use a straight peeler for better control
⦁ Start at the stem end
⦁ Create a continuous spiral by maintaining consistent pressure
⦁ Keep the fruit moving, not just the peeler
⦁ For tart preparations, leave some skin for added texture and nutrition
Peaches and Apricots
Soft stone fruits demand the gentlest approach:
⦁ Use a serrated peeler exclusively
⦁ Work with ripe but firm fruit
⦁ Apply minimal pressure—let the serrations do the work
⦁ Alternative: Blanch for 30 seconds, then peel by hand if the skin is particularly delicate
Conquering Squash and Gourds
Butternut Squash
One of the most challenging vegetables to peel:
⦁ Cut off both ends to create stable surfaces
⦁ Stand the squash upright on the cutting board
⦁ Use a Y-peeler with firm, downward strokes
⦁ Work in sections from top to bottom
⦁ Peel away from your body for safety
⦁ Alternative: A sharp knife may be more efficient for very large squash
Zucchini and Cucumber
These vegetables offer opportunities for both traditional and decorative peeling:
⦁ For complete peeling: Use light pressure with any peeler type
⦁ For striped effect: Alternate peeled and unpeeled sections
⦁ For ribbons: Use a Y-peeler with very light pressure to create thin, wide strips
⦁ For noodles: Use a julienne peeler to create “zoodles”
Handling Citrus Fruits
Lemons, Limes, and Oranges
Citrus peeling focuses on zest removal:
⦁ Use a Y-peeler for wide zest strips
⦁ Apply light pressure to avoid the bitter white pith
⦁ Work in long strokes from top to bottom
⦁ Create twists by peeling in spirals
⦁ For fine zest, use the peeler to remove strips, then mince
Dealing with Delicate Produce
Tomatoes
Tomatoes require the serrated peeler technique:
⦁ Choose firm, ripe tomatoes
⦁ Use a serrated peeler exclusively
⦁ Start at the top and work downward
⦁ Use sawing motion rather than pressure
⦁ Rotate frequently for even peeling
Kiwi
The fuzzy skin of kiwi responds to specific handling:
⦁ Use a serrated peeler
⦁ Work with firm kiwi
⦁ Apply gentle, consistent pressure
⦁ Peel immediately before use to prevent browning
Safety Techniques and Best Practices
Hand Positioning for Maximum Safety
The best techniques for using a vegetable peeler for fruits and vegetables always prioritize safety. Follow these guidelines:
⦁ The Claw Grip: Curl your supporting hand’s fingers inward, using knuckles to guide rather than fingertips
⦁ The Away Rule: Always peel away from your body when possible
⦁ The Stable Surface Rule: Use a cutting board or stable surface, never peel mid-air
⦁ The Fresh Blade Rule: Dull blades require more pressure and are more dangerous replace regularly
Preventing Common Injuries
Blade Contact Injuries:
⦁ Never rush your peeling
⦁ Maintain focus throughout the task
⦁ Stop if you feel tired—fatigue leads to accidents
⦁ Keep peelers sharp; dull blades slip more easily
Repetitive Strain Prevention:
⦁ Switch hands periodically
⦁ Take breaks during large batching tasks
⦁ Use ergonomic peelers with cushioned grips
⦁ Maintain relaxed grip pressure
Maintenance and Care for Optimal Performance
Cleaning Your Peeler
Proper cleaning extends peeler life and maintains performance:
⦁ Immediate Rinsing: Rinse under hot water immediately after use
⦁ Detail Cleaning: Use a small brush to remove stuck fibers from blade edges
⦁ Dishwasher Considerations: While many peelers are dishwasher-safe, hand washing preserves blade sharpness longer
⦁ Drying: Thoroughly dry to prevent rust, especially on carbon steel blades
Sharpening and Replacement
Signs Your Peeler Needs Attention:
⦁ Requires excessive pressure
⦁ Tears rather than slices
⦁ Leaves thick peels
⦁ Produces uneven results
Maintenance Options:
⦁ Some high-end peelers have replaceable blades
⦁ Professional sharpening services can restore ceramic peelers
⦁ Most standard peelers are inexpensive enough to replace annually
⦁ Invest in quality peelers that last longer\
Technique Comparison: Which Method for Which Situation?
Speed vs. Precision Table

Produce-Specific Technique Guide
Professional Tips for Efficiency and Quality
Batch Peeling Strategies
When preparing large quantities, the best techniques for using a vegetable peeler for fruits and vegetables include these efficiency boosters:
⦁ The Assembly Line Method:
⦁ Sort produce by type
⦁ Complete all washing first
⦁ Peel all items of one type before moving to next
⦁ Store peeled items in water or refrigerate immediately
⦁ The Prep Station Setup:
⦁ Bowl for peeled items (left side)
⦁ Cutting board in center
⦁ Bowl for peels/compost (right side)
⦁ This minimizes movement and maximizes efficiency
⦁ The Time-Saving Tricks:
⦁ Peel potatoes and store in cold water up to 24 hours ahead
⦁ Blanch difficult skins (peaches, tomatoes) for 30-second easy peeling
⦁ Invest in multiple peelers to avoid switching during batch work
Restaurant-Quality Presentation
Creating Uniform Peels:
⦁ Maintain consistent pressure throughout each stroke
⦁ Keep blade angle constant
⦁ Use the same peeler for all items of one type
⦁ Practice makes perfect—consistency improves with repetition
Decorative Techniques:
⦁ Ribbons: Ultra-light pressure creates paper-thin, wide strips
⦁ Stripes: Alternate peeled and unpeeled sections on cucumbers and zucchini
⦁ Spirals: Continuous peeling creates attractive garnishes
⦁ Julienne: Create vegetable noodles with julienne peelers
Maximizing Nutritional Value
Many nutrients concentrate in or just below the skin. The best techniques for using a vegetable peeler for fruits and vegetables balance nutrition with palatability:
When to Peel:
⦁ Waxed produce (conventional apples, cucumbers)
⦁ Thick, bitter skins (eggplant, winter squash)
⦁ Damaged or blemished areas
⦁ Personal preference for texture
When to Keep the Skin:
⦁ Organic produce with tender skins
⦁ Carrots, zucchini, and summer squash
⦁ Potatoes (after thorough scrubbing)
⦁ Apples and pears in baked goods
The Thin-Peel Technique: When you must peel, take the thinnest layer possible:
⦁ Use a sharp blade
⦁ Maintain light, consistent pressure
⦁ Let the peeler do the work
⦁ Don’t press hard—multiple light passes beat one heavy pass
Troubleshooting Common Peeling Problems
Problem: Thick, Uneven Peels
Solutions:
⦁ Sharpen or replace your peeler
⦁ Reduce pressure—you’re pressing too hard
⦁ Check blade angle—should be 20-30 degrees
⦁ Use longer, smoother strokes instead of short, choppy ones
Problem: Peeler Skips or Jumps
Solutions:
⦁ Clean the blade of stuck debris
⦁ Ensure produce surface isn’t too wet
⦁ Use a serrated peeler for slippery items
⦁ Apply more consistent pressure throughout the stroke
Problem: Hand Fatigue
Solutions:
⦁ Switch to a Y-peeler for better ergonomics
⦁ Take regular breaks
⦁ Alternate hands periodically
⦁ Ensure your peeler has a comfortable, cushioned grip
⦁ Check that your blade is sharp—dull blades require excessive force
Problem: Wasted Flesh
Solutions:
⦁ Use a sharper peeler
⦁ Lighten your pressure
⦁ Maintain proper blade angle
⦁ Consider if peeling is necessary—many skins are edible and nutritious
Special Applications and Creative Uses
Beyond Basic Peeling
The vegetable peeler is a versatile tool with applications beyond simple skin removal:
Creating Chocolate Curls:
⦁ Use a Y-peeler on room-temperature chocolate bars
⦁ Creates elegant dessert garnishes
⦁ Works best with thick chocolate bars
Making Cheese Shavings:
⦁ Perfect for Parmesan or aged cheeses
⦁ Creates delicate shavings for salads and pasta
⦁ Use light pressure for paper-thin results
Shaving Vegetables for Salads:
⦁ Create ribbons of zucchini, carrots, or asparagus
⦁ Adds visual interest and texture
⦁ Requires Y-peeler and very light touch
Removing Corn from the Cob:
⦁ Run peeler down corn cobs for creamed corn
⦁ More control than using a knife
⦁ Results in less waste
Creating Vegetable Noodles:
⦁ Use julienne peeler for “zoodles” or carrot noodles
⦁ Healthy pasta alternative
⦁ Perfect for low-carb diets
Seasonal Peeling Guide
Different seasons bring different produce, each requiring adapted techniques:
Spring Produce
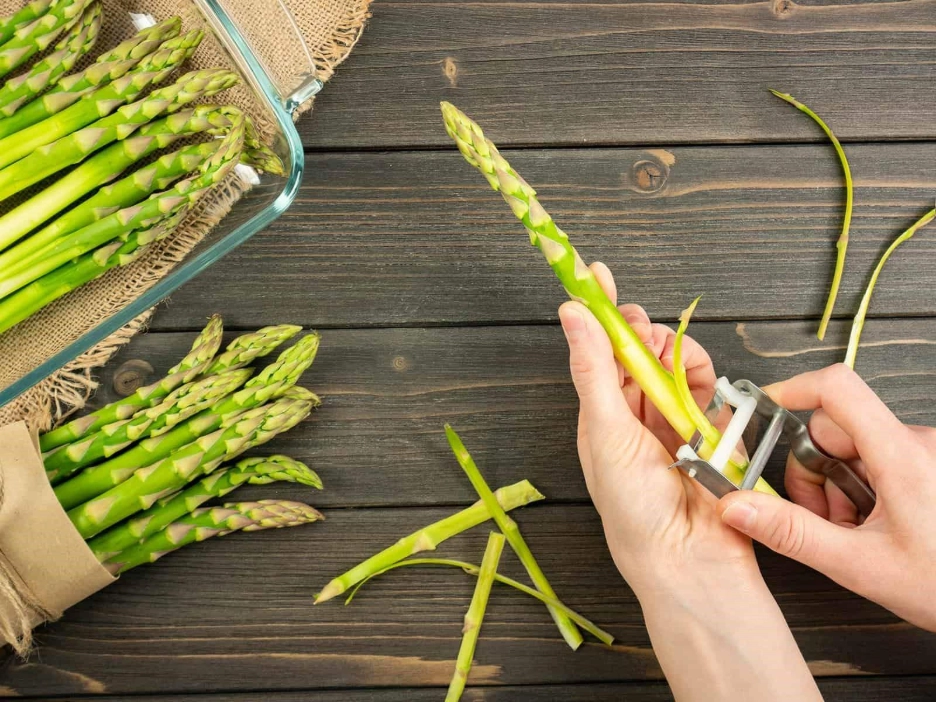
⦁ Asparagus: Peel tough outer layer from thick spears
⦁ Radishes: Generally don’t need peeling, but can remove thin outer layer if desired
⦁ New Potatoes: Thin, tender skin—often better left unpeeled
Summer Produce
⦁ Cucumbers: Partial peeling creates attractive stripes
⦁ Zucchini: Great for ribbon salads and noodles
⦁ Peaches: Ripe summer peaches peel easily with serrated peeler
Fall Produce
⦁ Butternut Squash: Peak season means easier peeling
⦁ Apples: Multiple varieties, all peel beautifully
⦁ Pears: Peel or leave skin based on variety and recipe
Winter Produce
⦁ Root Vegetables: Storage vegetables may have thicker skins
⦁ Citrus: Perfect season for zest and twists
⦁ Winter Squash: Requires more effort but yields hearty vegetables
Environmental Considerations and Waste Reduction
Composting Peels
The best techniques for using a vegetable peeler for fruits and vegetables include responsible disposal:
Compostable Peels:
⦁ All vegetable peels (except those treated with wax)
⦁ Most fruit peels
⦁ Avoid citrus in large quantities (can acidify compost)
Creative Peel Uses:
⦁ Potato peels: Season and bake for crispy snacks
⦁ Carrot peels: Add to stocks and broths
⦁ Apple peels: Simmer for homemade apple tea
⦁ Citrus peels: Candy, zest, or simmer in water for natural air freshener
Reducing Food Waste
Smart Peeling Practices:
⦁ Assess whether peeling is necessary
⦁ Use thin-peel technique to minimize waste
⦁ Save peels for stock or composting
⦁ Buy organic when possible to reduce need for peeling
Buying Guide: Choosing the Right Peeler
Features to Consider
Blade Material:
⦁ Stainless Steel: Most common, rust-resistant, affordable
⦁ Carbon Steel: Sharper edge, requires more maintenance
⦁ Ceramic: Extremely sharp, never needs sharpening, brittle
Handle Design:
⦁ Ergonomic grips: Reduce hand fatigue
⦁ Non-slip materials: Safer when wet
⦁ Size: Should fit comfortably in your hand
Additional Features:
⦁ Eye remover: Small pointed tip for potato eyes
⦁ Dual blades: Bidirectional peeling
⦁ Blade cover: Safety during storage
Investment-Worthy vs. Budget Options
Budget Peelers ($5-10):
⦁ Suitable for occasional use
⦁ Basic functionality
⦁ May need annual replacement
Mid-Range Peelers ($10-20):
⦁ Better blade quality
⦁ More ergonomic design
⦁ Longer lifespan
Premium Peelers ($20-40):
⦁ Professional-grade materials
⦁ Superior ergonomics
⦁ Often come with replaceable blades
⦁ Investment for serious home cooks
Conclusion: Mastering Your Peeling Skills
The journey to mastering the best techniques for using a vegetable peeler for fruits and vegetables transforms a mundane kitchen chore into an efficient, safe, and even enjoyable part of meal preparation. Throughout this comprehensive guide, we’ve explored everything from basic stroke techniques to advanced applications that extend far beyond simple peeling.
Remember, like any skill, peeling proficiency develops with practice. Start with the basic stroke technique, focus on safety, and gradually incorporate advanced methods as you become more comfortable. Your vegetable peeler is a powerful tool capable of much more than you might have imagined from creating restaurant-quality garnishes to preparing healthy vegetable noodles.
Whether you’re preparing a simple weeknight dinner or an elaborate holiday feast, these techniques will serve you well. The time you invest in mastering your peeler pays dividends in reduced prep time, less waste, more nutritious meals, and greater confidence in the kitchen.
Now it’s time to put these techniques into practice. Grab your peeler, select some fresh produce, and transform your approach to this essential kitchen task. Happy peeling!